How to Get Grid on iPhone Camera? (4 Easy Steps)
Are you looking to Get grid Lines on the camera app of your iPhone? Here is a simple guide on How to get grid on iPhone Camera✅✅✅.
Are you also among them who thinks about how to get grid lines on an iPhone camera? And, why does it becomes necessary to turn on the camera grid in your iPhone? Let me ask you one thing, do you use your iPhone to capture images that seem to appear like they were taken by a professional photographer?
Or are you searching for some pro ways and tips to improve your photography skills erstwhile? If you do think that you also need a guide on how you can improve your photography skills by turning the camera grid option on your iPhone, then you certainly need to dive down the blog.
So, what are you waiting for? Let’s go and see what does camera grid means, how to get a grid line on an iPhone camera, and what are the pro tips in creating an awful photo you desire!
What does iPhone Camera Grid mean?
Table of Contents
I must say this feature is incredibly easy to perform and also doesn’t require any additional software. So, why not? You learn more about the iPhone camera’s hidden feature and how can you use it just by scrolling down.
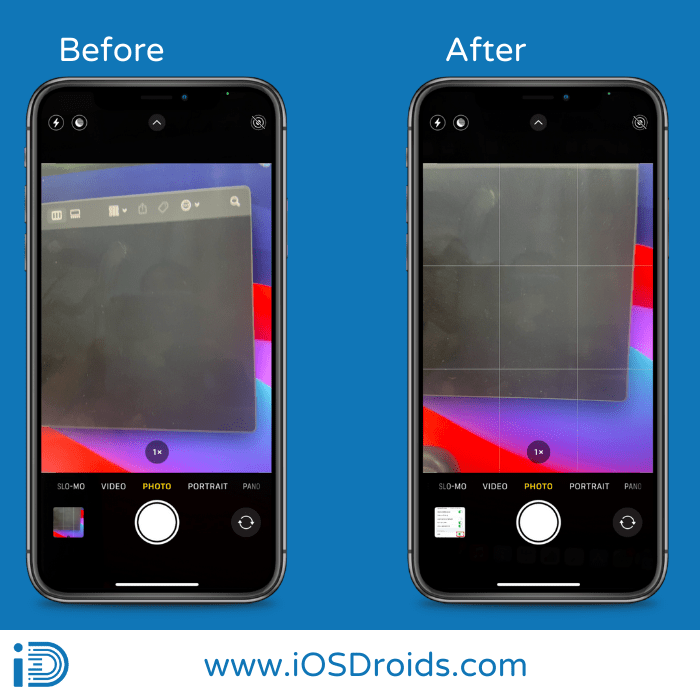
First thing first, you need to know that the camera grid is a feature that mostly uses four lines that run either horizontally or vertically across the screen to split the frame of your images.
Eventually, it overlays 9 squares across the screen when it is active. As a result of this, the objects placed at the intersections of those lines can no doubt make your images considerably more sounding and appealing.
How to get Grid Lines on an iPhone Camera?

The camera grid may be turned on in modern versions of iPhone and iOS via the Settings app; here’s where to look to turn it on:
- In iOS, open the Settings app.

- Scroll down to the “Camera” options for the next step.
- Eventually, in the third step, you need to toggle the “Grid” switch to the “ON” position.
- Immediately view the grid by opening the iPhone camera app.


Video Tutorial on How to Get Grid on iPhone Camera
How to get Grid Lines on an iPhone Camera before the iOS6 Version?
Any contemporary version of iOS will work with the camera grid on the iPhone, iPad, and iPod touch. However, on finished photographs in the photo stream, the grid will not appear.
In iOS 6 and before, you can enable iPhone Camera Grid. You can enable the Camera Grid in the Camera app if you have an earlier iPhone model:
- From the home or lock screen, launch the Camera app.
- At the top, click “Options.”
- The grid should be turned on by swiping to the right.
- To return to Camera, tap “Done” to conceal the Options again.
Top 5 Advantages of Grid on iPhone Camera
The iPhone camera grid may dramatically improve the quality of your images. The following are the primary reasons why you should be trying to use the iPhone camera grid to give the photos a good look.
1. iPhone Camera Grid is usually based on a Professional Technique.
The ‘Rule of third’ is the foundation or else can be said the primary rule of the camera grid. Professional photographers are familiar with this method, which has been employed in art since the 18th century.
In other words, the ‘rule of third’ is the second most choice to most photographers and painters in real-time. For this situation, the camera grid becomes handy for various artists and upcoming photographers.
Anyone can snap professional-looking images with the camera grid. The foremost ‘rule of third’ is the idea of splitting your captured photos into thirds using a 3 x 3 square grid and aligning your photos with the lines on that grid identically.
2. It improves the Quality of your Photographs.
The second most important benefit of using a camera grid is that you can use the camera grid to level your images. This can be done by aligning things to the straight lines on your screen.
You can avoid crooked, uneven photographs by aligning everything exactly. This eliminates the need to rotate or angle photos during editing.
3. The Camera Grid might help you take better Landscape Photos.
The third most important characteristic of using the camera grid is that it becomes handy for landscape photographs. As it especially shows you were to frame the horizon for the best picture.
It’s just plain dull to put the horizon in the center of the frame. That is something that anyone can do. Objects of interest in the foreground can be matched to the lines to ensure that they enhance your photo and lead attention to the subject.
Also, for this, you need to take two-thirds of the frame and fill that part with the photo that interests you most. This becomes simple to put there because of the grid.
3. It’s Simpler to Frame Images.
When we take out our phones to take a picture, we normally center the subject and don’t think twice about it. Isn’t it true that the subject should be in the middle because it’s the image’s focal point?
According to some professional photographers, however, this is not the case. According to them, this strategy is not only boring and imaginary, but it is also not the ideal or trusted way to present an image.
If you see using the camera grid, aligning the image with lines on opposite sides of the screen does draw greater attention to the viewers in subtle. It does give artistic looks. Also, with this feature in your iPhone, you’ll get the most out of your photos.
In addition to this, you can also align the eyes of the image with the grid when you click photos in portrait format. This adds a significant portion to the shot.
5. It helps with Photo Composition.
Activating the grid draws attention to specific regions of your photos, revealing the frame’s exact composition. It forces you to concentrate on the full-frame instead of just the topic.
You may make a much more balanced photo and avoid utilizing a lot of negative space by arranging points of focus along the grid lines. As a result, the composition of the image is considerably richer.
5 Key Tip to get Grid Lines on iPhone Camera
When you take a snapshot on an iPhone camera grid, you need to be careful and know some pro tips in creating awesome images. So, here we’ve recommended some tips for using the rule of thirds, also known as camera grid in an easy way for creating the desired background and adding awful photos to your gallery.
Once you start practicing, applying the rule of thirds is simple. Here are some strategies for leveraging the rule of thirds to generate great images if you’re taking photos with your iPhone.
1. On your iPhone Camera, use the “Rule of Third”
Once you’ve activated the camera grid on your iPhone, it’ll appear whenever you open the Camera app to take a picture. Unless, of course, you’re using the rule of thirds, you won’t even notice it’s there. So, what you can do is on your iPhone, follow the instructions given as under to enable the rule of thirds grid:
- In the first step, on your iPhone, go to the Settings app.
- Tap the Camera after scrolling down.
- Toggle the Grid option under Composition on.
- You can crop your photo using the rule of thirds.
Even if you’re just clicking images at random and aren’t paying attention to the “rules,” you may use cropping to apply the rule of thirds. Here’s how to make a rule of thirds composition with your iPhone photo:
- Tap Edit on the photo you want to edit from your Camera Roll.
- Finally, once you’ve selected the photo, go to the bottom of the screen, and tap the crop symbol.
- In the third step, you need to tap the rectangle option flashing in the upper right corner of the screen, then choose the Original option to keep your photo’s current proportions.
- Drag the photo’s edges until you’re satisfied with the composition. To make things easier, grid lines will emerge.
- To save your snapshot, tap Done.
2. Allow for Negative Space in your Photograph.
In simple words, you can assume that the negative and positive spaces in your photograph can be artistically combined to give interest to your shots.
However, negative space can be defined as the region surrounding the main subject of your photograph. The utilization of a lot of negative space while applying the rule of thirds can be a strong strategy.
So, always try to use a third of your image for your subject matter. The other two-thirds can be used for a lot of negative space.
3. You Can use more than One Point on Grid.
The rule of thirds grid creates four intersecting grid lines that serve as essential places for inserting important photo elements. You don’t have to utilize them all, but it’s enjoyable to experiment with different compositions when shooting so that your image has multiple focal points.
However, at the same time, you do need to keep in mind that the intersecting grid lines are merely suggestions for placing the photos you ought to select. The only genuine rule is to embrace whatever artistic composition suits you best.
4. Try to Place the Horizon Line on any Horizontal Grid.
This technique or feature available on an iPhone camera is mostly used in landscape photography. For instance, when you take photos horizontally, you simply place the horizon line on any one of the horizontal grid lines, so that it gives interest to the subject.
However, if you want to emphasize the sky, you need to place your horizon on the bottom grid line. By doing this, you can see that the sky covers the majority part of your image.
On the other hand, if you want to emphasize the foreground, you need to place your horizon on the top grid line. As a result of this, you will find that either the land or the water covers up the majority of the image captured.
5. Align Vertical Elements by the Grid Lines.
The fifth tip to get grid lines on your iPhone camera is to place the subjects along the strong vertical lines, for instance, buildings, people strolling, trees, flowers, etc. To be precise, you can assume that the subjects should be placed on vertical grid lines on either side of your shot.
Depending on which way the people are looking or walking, you can choose which grid line to utilize. Even plants will appear to be “facing” one direction or the other, requiring more room in that direction.
FAQs

1. What is the best way to acquire a grid on iPhone camera?
Ans. The best way to acquire gridlines on the iPhone camera is to tap the downward-pointing arrow appearing at the topmost of the screen. As a result of this, the Google Camera app will be opened. Now, tap the gear icon in the subsequent popup. And, finally, select a grid option (such as 4 x 4) from the window that appears after tapping Grid Type.
2. Explain the iPhone camera gridlines composition?
Ans. The iPhone camera grid lines are composed of a camera’s built-in grid. The built-in grid of this camera divides the entire frame into thirds, either horizontally or vertically. This simplifies photo framing and makes it simple to capture interesting shots by following the rule of thirds. To use the grid in iOS 7, go to Settings -> Photos and Camera -> Grid -> ON.
3. On camera, what is Grid?
Ans. Before snapping a picture, most current smartphone cameras can overlay the lines on the screen. These are known as grids or gridlines, and they aren’t visible in the shot! Composition is the most common photo analysis response. To be precise, the camera grid has the power to make or shatter a fantastic photograph you wish.
4. How can I enable Touch Grid on iPhone Camera?
Ans. Firstly, launch Settings from your Home screen. Then in the next step, you need to enable Numbered Grid Overlay option available in Voice Control section on an iPhone and iPad. Go to Accessibility and select it. Toggle Voice Control on and off. The overlay is tapped. Select Numbered Grid from the drop-down menu. In this way, you can enable Touch Grid on your iPhone and iPad.
5. In terms of photography, define the rule of thirds?
Ans. In simple words, the rule of thirds is a basic approach that calls for aligning the photos you desire. It is the most important characteristic along imaginary grid lines that usually divide your selected image into thirds either vertically or horizontally.
This is an excellent composition tool because it offers a sense of asymmetrical balance to your image by creating negative space. This isn’t a hard and fast guideline, like many photographic composition rules, but it’s a fantastic place to start while framing your shot.
6. What significance can be underlined while using the rule of thirds?
Ans. The advice to split your image into thirds using imaginary grid lines traveling both vertically and horizontally is known as the “rule of thirds.” Place your most intriguing pieces where the grids meet as a general rule.
Related Posts:
- How to Unblur an Image on iPhone
- How to Combine 2 or more Photos on iPhone
- How to Rename photo albums on iPhone
- How to Convert Picture to PDF on iPhone
- How to Delete Photo Albums on iPhone
- How Many Photos Can You Airdrop at Once
- How to Invert a Picture on iPhone?
- Adobe Photoshop Express app
Summary

In sum, I’d like to say that the Apple iPhone camera does offer its users a variety of modes, including burst mode, time mode, and other appealing modes. So, it becomes necessary to learn how to get a Camera Grid on your iPhone to take either a regular shot or a square photo.
In other words, you can see that the camera grid does assist you in taking a straight image by aligning the focus either horizontally or vertically. Thus, I hope you finally came to know the necessity of using your iPhone camera grid and how can you enable it to capture a better picture where you even don’t need to perform any sort of editing.